

Written by Michael Haigh, Technical Marketing Engineer at Nutanix
Enterprises are increasingly shifting towards cloud native applications as they’re simple to deploy and scale, they’re highly available, and they’re space and resource efficient. Cloud Native applications and the public clouds enable developers to focus on developing applications rather than dealing with the underlying infrastructure.
On the Nutanix Enterprise Cloud OS, these benefits are no longer restricted to the public cloud, as they’re now available in your private datacenter with Nutanix Cloud Native. Nutanix Cloud Native enables developers and administrators with the Freedom to Invent and the Freedom to Run their applications with the following products:
- Nutanix Karbon – an enterprise-grade Kubernetes distribution that simplifies the provisioning, operations and lifecycle management of Kubernetes.
- Nutanix Era – a database management solution that that automates the provisioning and protection of Postgres, MySQL, Oracle, and other databases.
- Nutanix Objects – an S3 compatible object storage solution.
Additionally, all of these products are fully compatible with the public clouds, meaning no code or workflow changes are required.
In this blog post we’ll see how a developer or IT admin can quickly and easily deploy a cloud native application with Nutanix Cloud Native. If you’d like to follow along in your own environment, you’ll need the above products set up. For any that you do not have, please see:
- Nutanix Karbon is in General Availability (GA) in Prism Central 5.10.1, please see our portal documentation for instructions on how to enable Karbon and quickly deploy a production ready Kubernetes cluster.
- Nutanix Era is General Availability (GA), please see our portal documentation for information on how to get started.
- Nutanix Objects is General Availability (GA) in Prism Central 5.11, please see our portal documentation for information on how to get started.
The application we’ll be deploying today is a containerized version of Oscar, which is a popular e-commerce framework for Django. Here’s the overall architecture of the application:
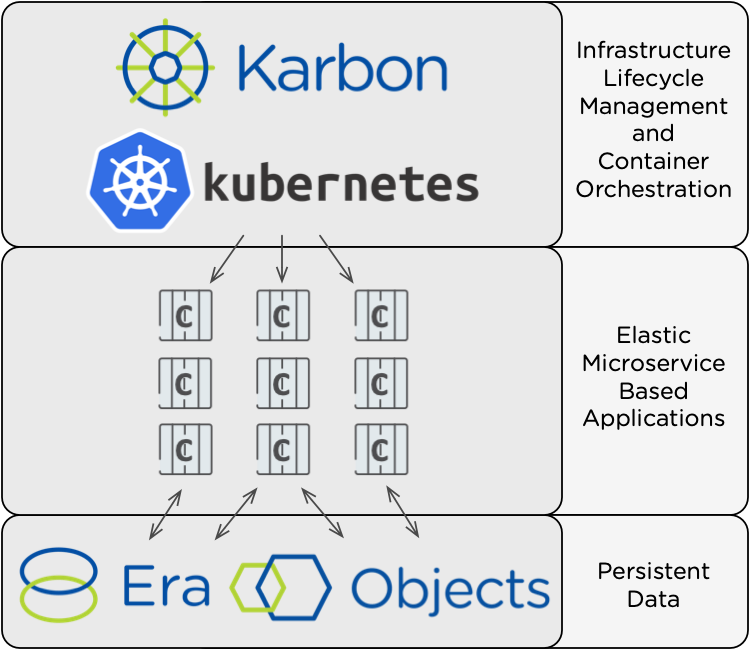
Nutanix Karbon is the lifecycle manager of our Certified Kubernetes cluster, which in turn orchestrates our container based web application. Since containers are ephemeral, we’ll use Nutanix Objects to store static images, and an Era provisioned database to store all other application data. Let’s get started!
Nutanix Era
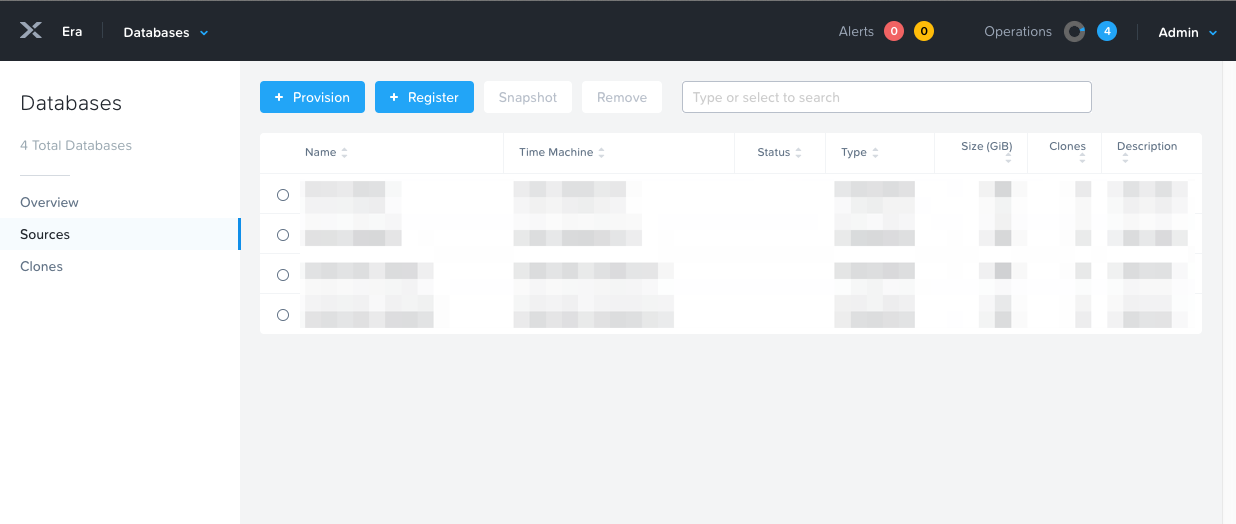
To store our web application’s data, we’ll be using a PostgreSQL database that’s provisioned and managed by Nutanix Era. If you haven’t done so already, log in to your Era UI. Select the Dashboard dropdown in the upper left, and then select Databases. On that page that appears, click the blue + Provision button:
In the pop-up, select PostgreSQL and then click Next.
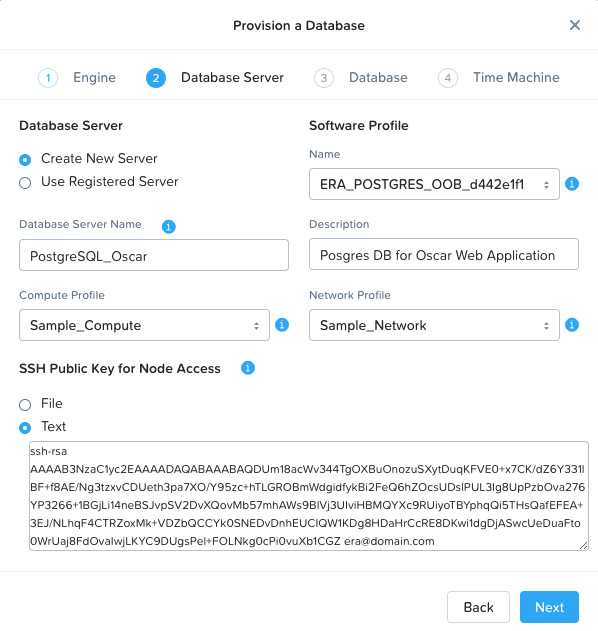
On the second page titled Database Server, select Create New Server and fill out the rest of the fields. The name and description fields can be anything meaningful to you. For the profile fields, you can select the sample profiles, or you can define your own under the Profiles section of Era. The SSH public key will be used in the event you need to SSH into the database VM. You can select the public key of your primary workstation, or generate and output one with the following commands:
ssh-keygen -t rsa -f ~/erakey -C era@domain.com
cat ~/erakey.pub
Your screen should look something like this after all fields are completed:
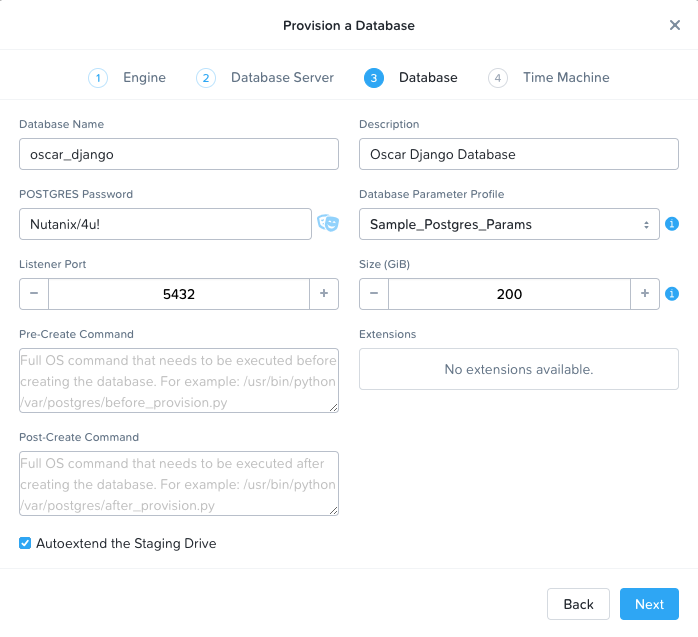
Click Next. On the Database page, fill out the Name, Description, and Password fields to your liking. If you specify the name as oscar_django and password as Nutanix/4u! then there will be fewer fields to configure in the Kubernetes YAML files later, but this is not required. For the Profile field, either select the sample, or configure your own under Era > Profiles.
Leave the rest of the fields as default, and your page should look something like this:
Click Next. On the Time Machine page, add a Description, and fill out your database’s time machine SLA and schedule, or leave the defaults. For a production database, these fields would be governed by your business requirements.
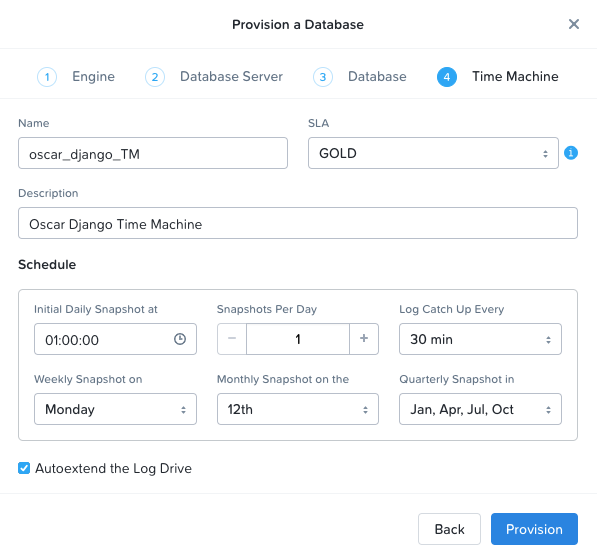
Click Provision. You should see a blue banner appear at the top of the page, click on it to see the status of your database provisioning. The entire process should take under 10 minutes.
Nutanix Objects
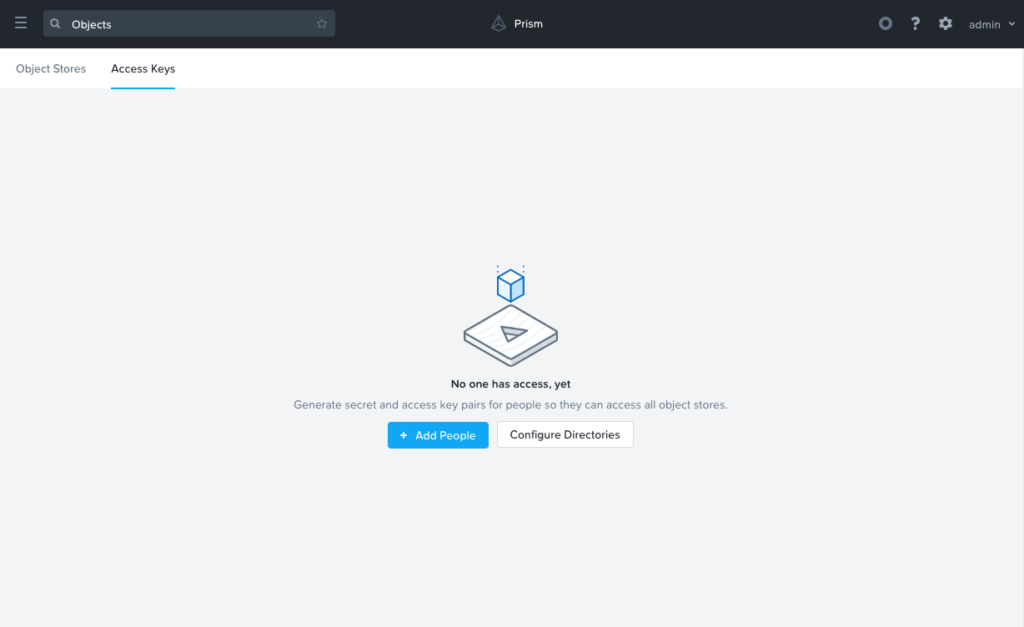
In your Prism Central instance where you have Nutanix Objects deployed, navigate to Services > Objects, then select the Access Keys tab along the top, and then click + Add People.
On the pop-up that appears, select the Add people not in a directory service radio button, and enter in an email for the application.
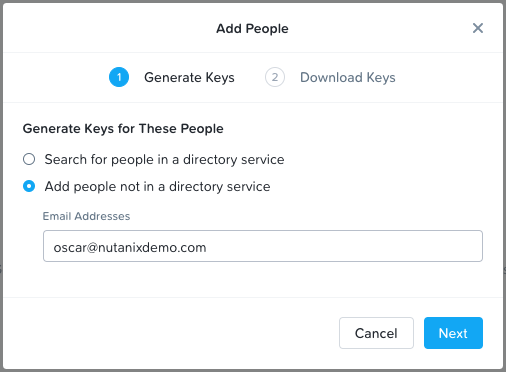
Finally, click Next, and then the Download Keys button.
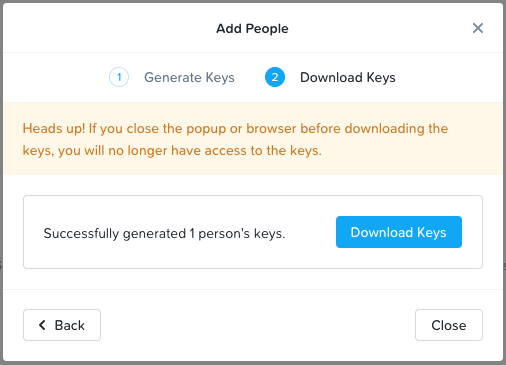
This will download your keys to your local computer, which will be used in a later step. Be sure to store these keys in a secure location, as they’ll be able to read and write to our object storage bucket.
Next, click the ObjectStores menu along the top of the UI, and select your desired object store.
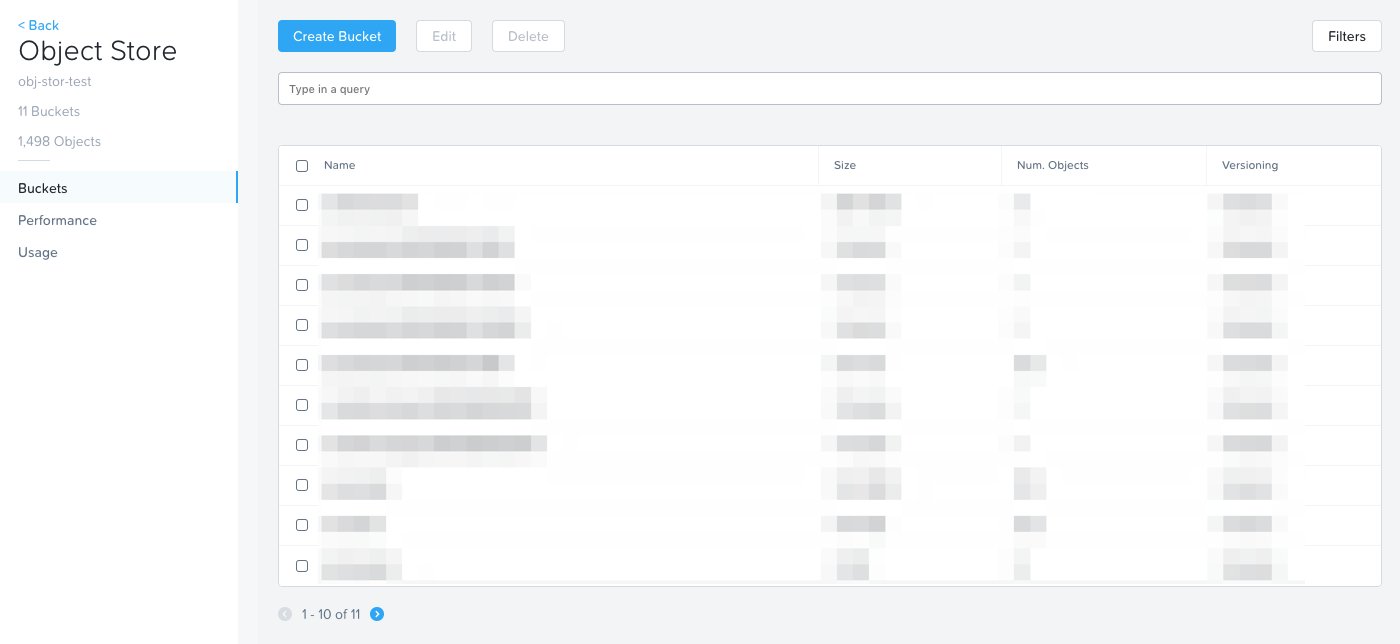
On the page that appears, click the blue Create Bucket button. In the UI that appears, name your bucket, if you choose oscarstatic, there will be fewer configuration steps later when modifying the Kubernetes YAML files, but this is not required.
For the Object Versions and Lifecycle Policies, you’re welcome to choose whatever makes sense for your environment.

Click Create. You should see your bucket appear in the UI. Click your newly created bucket, and in the left column, select the User Access link.
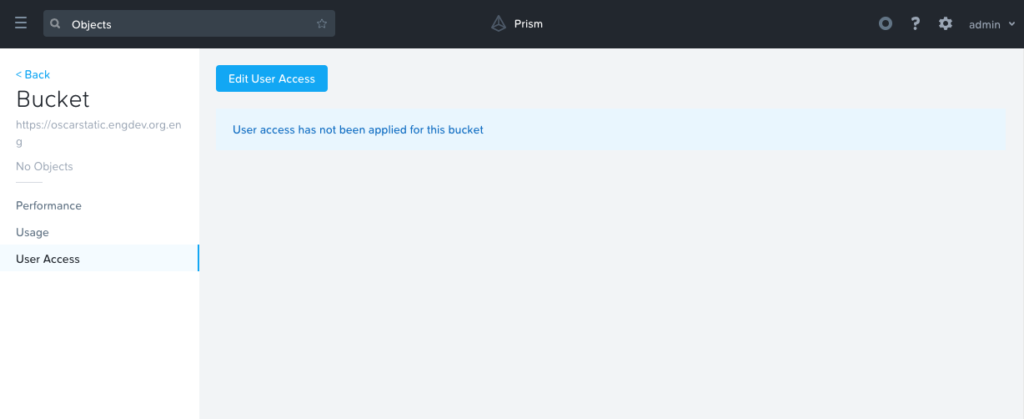
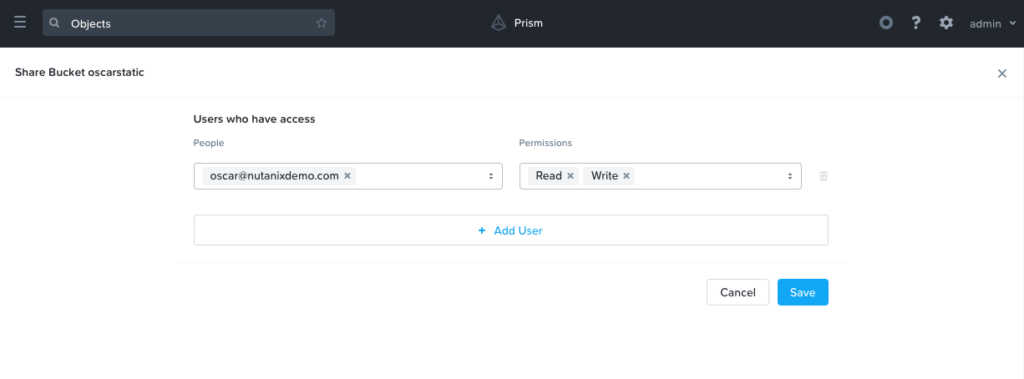
On the new page that appears, add our recently created email address, and then be sure to select both Read and Write.
Nutanix Karbon
Ensure you have a Karbon Kubernetes cluster deployed, and you’re able to manage via kubectl. If you do not, please see our Nutanix Karbon Guide by going here, and selecting ‘Karbon’ from the Software Type dropdown.
From your workstation of choice, create three folders:
mkdir objects/
mkdir era/
mkdir django/
In each of these folders, we’ll be creating a number of Kubernetes YAML files that define our application. For each file outlined below, you’ll want to create a corresponding file in the specified directory. On some of them, we’ll call out certain fields that you’ll want to replace entries to match your environment.
Objects
First, in your objects folder, create a file name objects-secrets.yaml with the following contents:
apiVersion: v1
kind: Secret
metadata:
   name: object-credentials
   labels:
     app: django
     component: storage
     tier: backend
type: Opaque
data:
   access: eF81TFBTY08ybEhkVWtGdVhPSGk3OTJhX2pYU3k5WHA=
   secret: NDlsYmNIbFFMNEhlTlNpRmhpNmdGbFd2NlMzcGhJYmk=
This defines a set of credentials that our Oscar web application will use to PUT images into our Nutanix Objects object storage. Be sure to substitute in your base64 encoded access and secret keys that were generated during the Nutanix Objects setup. If you’re not familiar with base64 encoding, here’s an example.
$ echo -n "x_5LPScO2lHdUkFuXOHi792a_jXSy9Xp" | base64
eF81TFBTY08ybEhkVWtGdVhPSGk3OTJhX2pYU3k5WHA=
$ echo -n "49lbcHlQL4HeNSiFhi6gFlWv6S3phIbi" | base64
NDlsYmNIbFFMNEhlTlNpRmhpNmdGbFd2NlMzcGhJYmk=
Era
Next, in your era folder, we’ll want to create two files. The first is named era-secrets.yaml, with the following contents:
apiVersion: v1
kind: Secret
metadata:
   name: postgres-credentials
   labels:
     app: django
     component: db
     tier: backend
type: Opaque
data:
   user: cG9zdGdyZXM=
   password: TnV0YW5peC80dSE=
Like the previous file, this defines a set of credentials that our Oscar web application will use to access our Era provisioned database. The data: user field should be left alone, as that is the base64 encoded value of our user, postgres. If you used a password of Nutanix/4u! in the previous step when provisioning a Postgres Database with Era, then you can leave the data: password field as is. If you used a custom password, base64 encode it as shown above, and substitute it in.
The second era file should be called era-service.yaml:
kind: Service
apiVersion: v1
metadata:
   name: postgres-service
   labels:
     app: django
     component: db
     tier: backend
spec:
   type: ExternalName
   externalName: <EraDatabaseIPorHostname>
   ports:
   - port: 5432
This file defines a kubernetes Service, of type ExternalName. This allows kubernetes objects to access an external service at the specified IP or hostname. You’ll want to substitute in the IP of your Era deployed database from the beginning of this guide. To find your IP, log in to the Era UI, and navigate to Databases > Sources. The IP is listed in the description column of the table presented.
Django
In our django folder we’ll be creating four files and each of them will be described in details below.
Our first file is django-configmap.yaml:
apiVersion: v1
kind: ConfigMap
metadata:
   name: django-env
   namespace: default
data:
   S3_ENDPOINT_URL: "http://<Objects-Endpoint-IP>:80/"
   STATIC_BUCKET: "oscarstatic"
   DATABASE_NAME: "oscar_django"
ConfigMaps allow us to bind configuration settings to our containers at runtime, which makes our Oscar container image more portable. Without this ConfigMap, the above values would be set to their hardcoded value within the docker image, making the image just about useless for other environments.
At minimum, you’ll need to change the data: S3_ENDPOINT_URL field to match your Nutanix Objects endpoint URL. If you’re not sure of your endpoint URL, you can find it in Prism Central Menu > Services > Nutanix Objects.
If you used custom bucket and database names in the steps above, then you’ll need to change those fields as well. If not, then leave them as is.
Our second file is named django-deployment.yaml:
apiVersion: apps/v1beta2
kind: Deployment
metadata:
   name: oscar-django-deployment
   labels:
     app: django
     component: oscar
     tier: frontend
spec:
   replicas: 3
   selector:
     matchLabels:
       app: django
   template:
     metadata:
       labels:
          app: django
          component: oscar
          tier: frontend
     spec:
       containers:
         - name: oscar-django
           image: michaelatnutanix/oscar_jet:latest
           ports:
             - containerPort: 8000
           env:
             - name: DATABASE_USER
               valueFrom:
                 secretKeyRef:
                   name: postgres-credentials
                   key: user
             - name: DATABASE_PASSWORD
               valueFrom:
                 secretKeyRef:
                   name: postgres-credentials
                   key: password
             - name: DATABASE_HOST
               value: postgres-service
             - name: ACCESS_KEY
               valueFrom:
                 secretKeyRef:
                   name: object-credentials
                   key: access
             - name: SECRET_ACCESS_KEY
               valueFrom:
                 secretKeyRef:
                   name: object-credentials
                   key: secret
           envFrom:
           - configMapRef:
               name: django-env
While this file can be left exactly as is, let’s go over it in a bit more detail:
- The kind is a Deployment, which is a Kubernetes Controller that defines a set of Pods.
- The replicas key indicates how many pods (which generally, but not always, contain a single container) to spin up.
- The metadata labels allow us to tie in other Kubernetes objects, which will come in to play in an upcoming file
- The containers name, image, and ports keys specify what we should name our pods once deployed, the image source of the container (stored on Docker Hub), and the port that the containers communicate on.
- The env section contains many entries that should look familiar: Our Era database user and password, which is sourced from our era-secrets.yaml file (named postgres-credentials).
- Our Era database host, which is sourced from our era-service.yaml file (named postgres-service).
- Our Nutanix Objects access and secret access keys, which is sourced from our objects-secrets.yaml file (named object-credentials).
- The envFrom entry ties in the django-configmap.yaml ConfigMap from the previous step to set the necessary environment variables in our application to our runtime values.
The third file in this folder is named django-migration.yaml:
apiVersion: batch/v1
kind: Job
metadata:
   name: oscar-django-migrations
   labels:
     app: django
     component: oscar
     tier: frontend
spec:
   template:
     metadata:
       labels:
         app: django
         component: oscar
         tier: frontend
     spec:
       containers:
         - name: django
           image: michaelatnutanix/oscar_jet:latest
           command: ['/bin/bash', 'migrate.sh']
           env:
             - name: DATABASE_USER
               valueFrom:
                 secretKeyRef:
                   name: postgres-credentials
                   key: user
             - name: DATABASE_PASSWORD
               valueFrom:
                 secretKeyRef:
                   name: postgres-credentials
                   key: password
             - name: DATABASE_HOST
               value: postgres-service
             - name: ACCESS_KEY
               valueFrom:
                 secretKeyRef:
                   name: object-credentials
                   key: access
             - name: SECRET_ACCESS_KEY
               valueFrom:
                 secretKeyRef:
                   name: object-credentials
                   key: secret
           envFrom:
           - configMapRef:
               name: django-env
       restartPolicy: Never
   backoffLimit: 5
You should notice that this file looks quite similar to the previous. The key difference is that this is a Kubernetes Job rather than a Deployment. Jobs create one or more pods to complete a particular task, and once that task is completed, the pods are cleaned up. In our app, this task is to seed the Postgres database and object storage with our sandbox data. Without that, we would have an empty, boring application. No modifications are needed to this file.
The fourth (and final) file of our application is named django-service.yaml:
kind: Service
apiVersion: v1
metadata:
   name: oscar-django-service
   labels:
     app: django
     component: oscar
     tier: frontend
spec:
   selector:
     app: django
   ports:
   - protocol: TCP
     port: 8000
   type: NodePort
This file creates a Kubernetes Service, of type NodePort, which means it exposes a particular port (8000 in our case) externally from the Kubernetes cluster. The selector field connects this service to our django web app pods that are deployed via our django-deployment.yaml file. This will be what allows us to access the app from a web browser once we have a running application. In a future blog post, we’ll see how we can improve upon the NodePort Service with a Kubernetes Ingress Controller.
Application Deployment
We’re now ready to deploy our application. To do so, simply run the following three kubectl commands:
kubectl apply -f era/
kubectl apply -f objects/
kubectl apply -f django/
To access our application, we’ll need two pieces of information, a node IP, and our django service port number. To get this, run the following two commands:
kubectl describe nodes | grep InternalIP
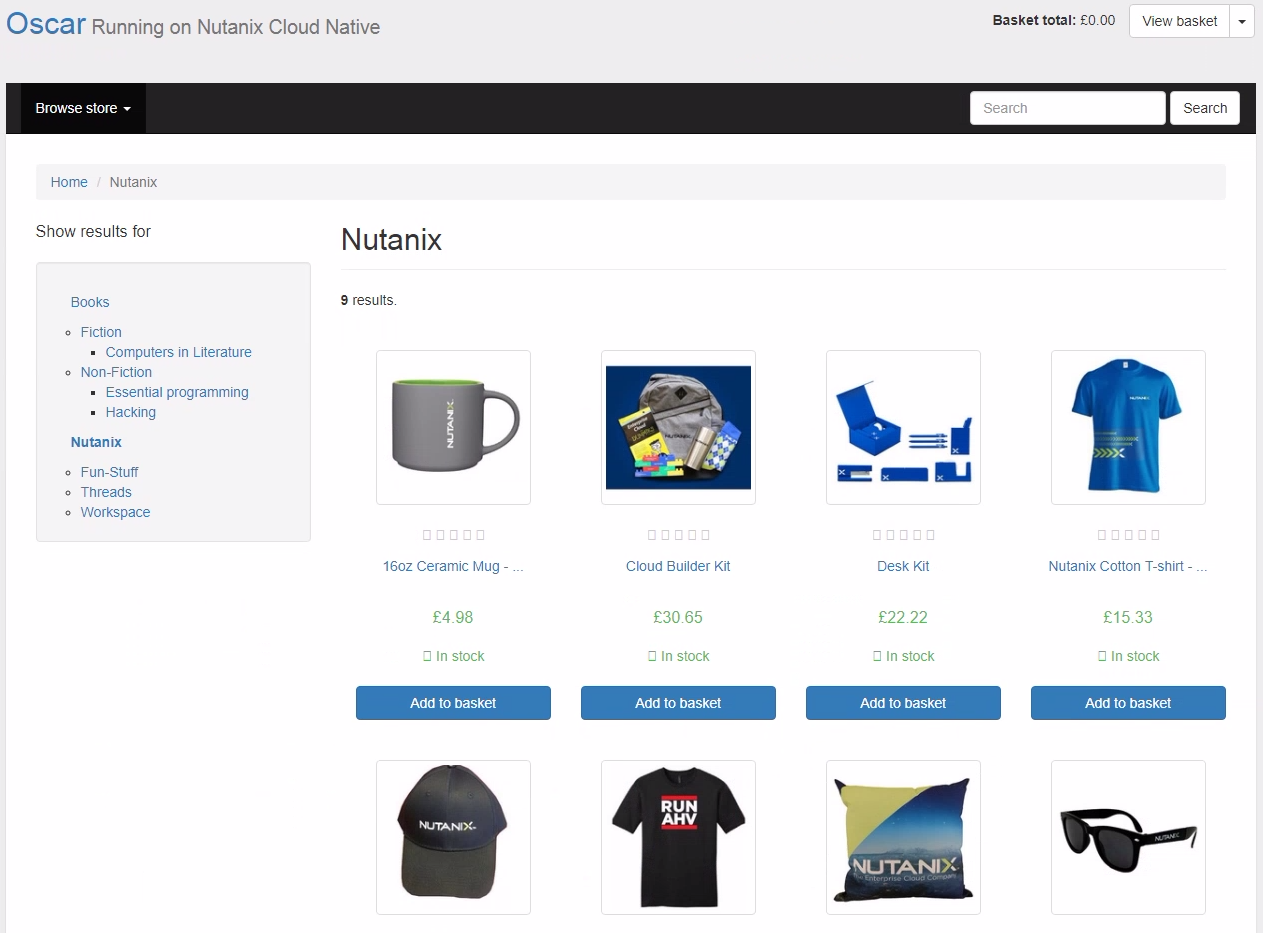
kubectl get svc oscar-django-serviceTake an IP from the first command, append the 3XXXX port number from the second command, and enter the combination in to a web browser. You should see a fully functional e-commerce website, running on Nutanix Cloud Native.
Please let us know if you have any comments or questions.
Forward Looking Statements Disclaimer: This blog includes forward-looking statements, including but not limited to the availability of new products, product features and services. These forward-looking statements are not historical facts, and instead are based on our current expectations, estimates, opinions and beliefs. The accuracy of such forward-looking statements depends upon future events, and involves risks, uncertainties and other factors beyond our control that may cause these statements to be inaccurate and cause our actual results, performance or achievements to differ materially and adversely from those anticipated or implied by such statements, including, among others: the failure to integrate our products with our partner’s products and the possibility that we may not receive anticipated results from forming such partnerships; the introduction, or acceleration of adoption of, competing solutions, including public cloud infrastructure; a shift in industry or competitive dynamics or customer demand; and other risks detailed in our Form 10-K for the fiscal year ended July 31, 2018, filed with the Securities and Exchange Commission. These forward-looking statements speak only as of the date of this presentation and, except as required by law, we assume no obligation to update forward-looking statements to reflect actual results or subsequent events or circumstances.
Disclaimer: This blog may contain links to external websites that are not part of Nutanix.com. Nutanix does not control these sites and disclaims all responsibility for the content or accuracy of any external site. Our decision to link to an external site should not be considered an endorsement of any content on such site.
© 2018 Nutanix, Inc. All rights reserved. Nutanix, the Nutanix logo and the other Nutanix products and features mentioned herein are registered trademarks or trademarks of Nutanix, Inc. in the United States and other countries. All other brand names mentioned herein are for identification purposes only and may be the trademarks of their respective holder(s).